Automate Updating the Display Field in ArcGIS Pro Using the Python Window
Do you ever use Python within ArcGIS Pro? Here we explore the importance of the display field, how to find and modify it and harness the power of Python to streamline your workflow. Discover how a simple script can save you time and enhance productivity by updating display fields across multiple layers in ArcGIS Pro.
Overview
In the world of GIS, efficiency and automation are key. Python scripting in ArcGIS Pro allows us to streamline tasks and enhance productivity. Today, we'll discuss what the display field is in ArcGIS Pro, how to find it, and why you might want to change it. Then, we will explore a Python script that automates updating the display field for all layers in a map.
What is a Display Field in ArcGIS?
The display field in ArcGIS is a layer property that uses a designated attribute field to identify features in various contexts, such as editing tools, selection chips, MapTips, Pop-ups and published map services. Typically, it is set to a field that provides a meaningful identifier for the features, such as a name or ID.
Choosing an appropriate display field is crucial because it affects how features are identified and displayed on the map. Using a field such as Shape__Length as the display field will bring up an error (error #00241) because it is not a meaningful identifier, which will restrict you from publishing a web map to ArcGIS Online.
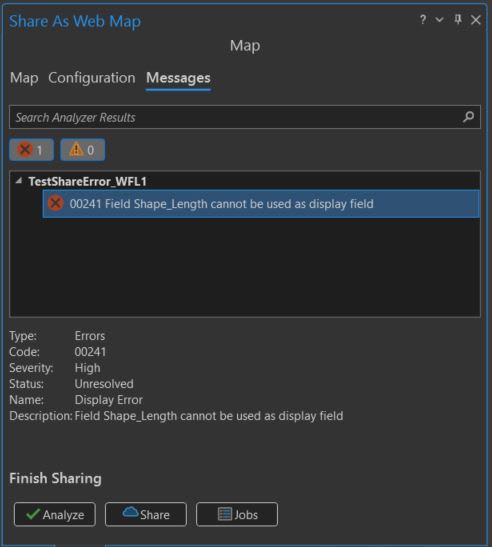 A common error related to the display field in ArcGIS Pro
Because the Shape_Length field is simply a numeric value representing the size of a feature, it is entirely possible that two different features could have the same shape length. You can manually adjust the display field by:
-
Right-clicking on the affected layer
-
Going to the layer properties
-
Navigating to the display tab
-
And selecting a different field from the display field drop down menu
-
Bonus tip: Users can add an Arcade expression to customize the display field

Navigating to the display field in the layer properties
Although this will resolve the error, what if you have 10 layers or 100 layers on your map that are all using Shape_Length as the display field? That’s where using the Python window in ArcGIS Pro can make your workflow more efficient!
The script is included in the next section of the blog, followed by a line-by-line breakdown to understand its functionality.
Updating the Display Field Script
import arcpy
# Define your project and map
project = arcpy.mp.ArcGISProject("CURRENT")
map = project.listMaps()[0]
# Define the display field you want to set
display_field = "OBJECTID"
# Loop through all layers and set the display field
for layer in map.listLayers():
    if layer.isFeatureLayer:
        # Get the layer's CIM definition
        cim_layer = layer.getDefinition('V2')
        # Update the display field
        cim_layer.featureTable.displayField = display_field
        # Apply the updated CIM definition back to the layer
        layer.setDefinition(cim_layer)
# Save changes
project.save()
Breakdown
Importing the arcpy Module
import arcpy
The script begins by importing the ArcPy module, which is essential for accessing ArcGIS Pro functionalities.
Defining the Project and Map
project = arcpy.mp.ArcGISProject("CURRENT") map = project.listMaps()[0]
Here, we define the current project and select the first map in the project. This sets the context for the layers we want to modify.
Setting the Display Field
display_field = "OBJECTID"
We specify the display field we want to set for all feature layers. In this case, it's the OBJECTID field.
Looping Through Layers
for layer in map.listLayers(): if layer.isFeatureLayer: # Get the layer's CIM definition cim_layer = layer.getDefinition('V2') # Update the display field cim_layer.featureTable.displayField = display_field # Apply the updated CIM definition back to the layer layer.setDefinition(cim_layer)
This loop iterates through all layers in the map. For each feature layer, it retrieves the layer's CIM (Cartographic Information Model) definition, updates the display field and applies the changes.
Technical Details: Cartographic Information Model (CIM)
The Cartographic Information Model (CIM) is a specification used to persist and transfer cartographic descriptions of GIS datasets. ArcGIS applications and application programming interfaces (APIs) use the CIM, represented in JavaScript Object Notation (JSON), for maps, scenes, layouts, layers, symbols and styles.
Key Components of CIM
-
CIMLayerDocument: A JSON document containing one or more layers representing data such as features from a feature class or raster.
-
CIMMapDocument: A JSON document containing a collection of layers and display properties for 2D maps or 3D scenes.
-
CIMLayoutDocument: A JSON document with a representation of a page, its elements and the maps and scenes on it for print or document export.
-
CIMReportDocument: A JSON document representing a report, its elements and the report-specific styles.
Accessing CIM with Python
Starting with ArcGIS Pro 2.4, Python developers have fine-grained access to the CIM, allowing them to modify many settings, properties and capabilities that exist in a project or an external document such as a layer file (.lyrx). This access enables developers to automate complex tasks and customize their GIS workflows extensively.
Back to the script: Saving Changes
project.save()
Finally, the script saves the changes to the project, ensuring that the updated display fields are retained.
To run the script in ArcGIS Pro directly, click on View in the top ribbon and select the Python Window from the windows group.

How to open the Python window in ArcGIS Pro
Conclusion
Changing the display field for individual layers in ArcGIS Pro is time consuming and often required when publishing a map to ArcGIS Online or ArcGIS Enterprise. By leveraging Python scripting, you can automate the process of updating display fields across multiple layers, significantly enhancing your workflow and productivity. Embrace the power of automation to optimize your GIS tasks and achieve better results in less time!
Check out our Esri Canada YouTube channel to see the script being used in ArcGIS Pro in the Updating the Display Field in ArcGIS Pro Using Python GeoSnap.