How to Access the Community Map of Canada Vector Basemap
Looking for a highly accurate Canadian basemap for your projects? The Community Map of Canada basemap is updated daily and built with authoritative Canadian data. Here are a few simple steps on how to include the Community Map of Canada vector basemaps in ArcGIS Online and ArcGIS Pro.
Your maps deserve a great basemap.
The Community Map of Canada is a basemap of Canada that is built from authoritative data. It is updated daily and republished twice a week. Content is provided by more than 440 sources across municipal, provincial and federal levels of government, along with other authoritative contributors such as First Nations, post-secondary institutions, port authorities and airport authorities. The number of contributors is continuously increasing. With availability in six standard styles, and an additional collection of custom basemap styles, this basemap provides up-to-date and accurate information to use as a foundation in your mapping projects.
The Community Map of Canada vector basemap is accessible via the Living Atlas, by visiting the item’s webpage, or by accessing it in the basemap picker in ArcGIS Pro or ArcGIS Online, provided your organization has enabled Esri vector basemaps. If not, you can easily enable it by following these simple steps:
Include the Community Map of Canada Vector Basemap in the Basemap Picker
- Log in as an administrator for your organization on ArcGIS Online.
- At the top of the site, click Organization and then click the Settings tab.

- In the General Settings, scroll down to “Organizational defaults” and ensure that “Canada” is selected as the Region. If you are unable to change this setting, you can still include the Community Map of Canada basemaps by creating a custom basemap gallery

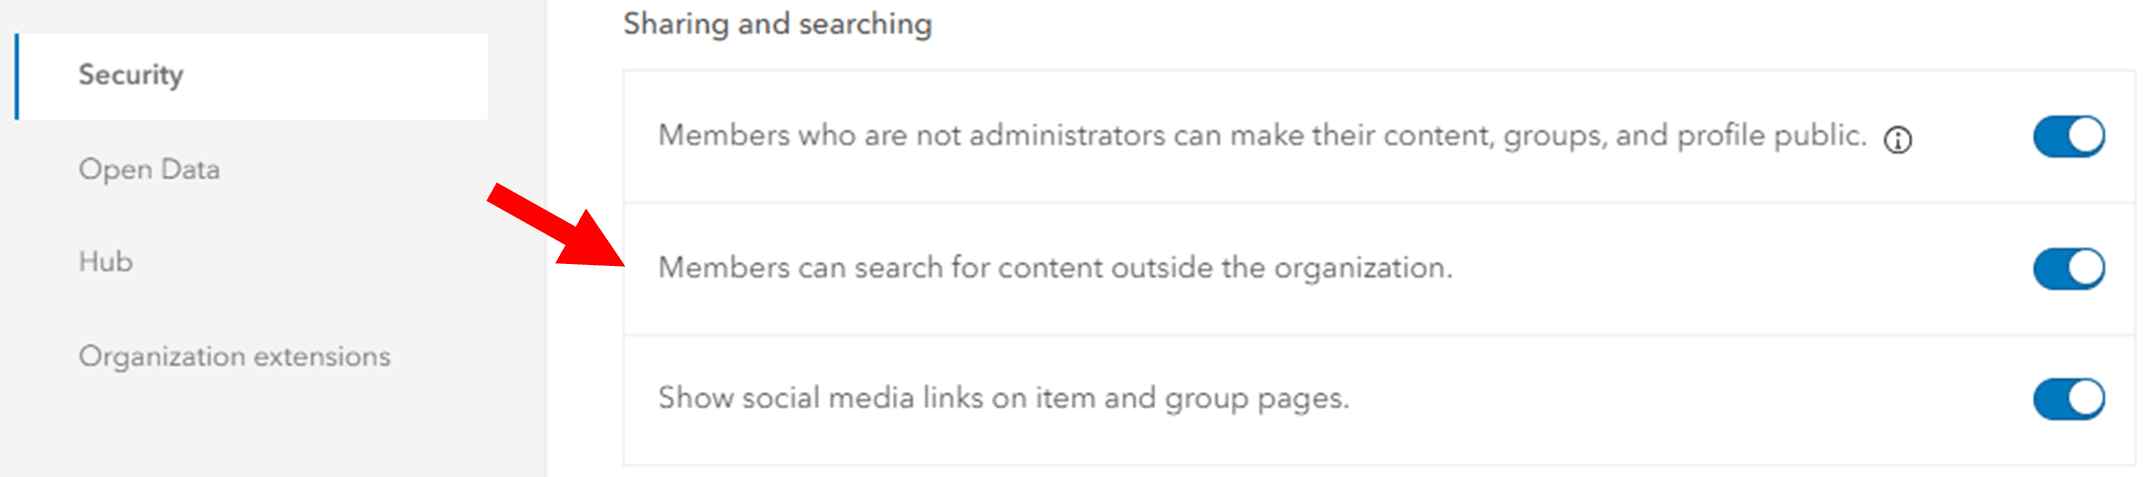
- In the Security Settings, scroll down to the “Sharing and searching” options in the Policy section. Ensure that the option for “Members can search for content outside of the organization” is toggled on so users can view the basemaps on ArcGIS Online. Users can use the basemaps in ArcGIS Pro, whether this option is toggled on or off.
- In the Map and scene Settings, scroll to the “Basemap gallery for maps and scenes” section. Click the Edit button in the 2D Group to open the group drop-down menu, which provides several basemap gallery options to choose from. Select “Esri Default.”

- You should now see the Community Map of Canada vector basemaps as part of your basemap options in ArcGIS Online and ArcGIS Pro.

Create a custom basemap gallery with the Community Map of Canada basemaps
- Log in as an Administrator to ArcGIS Online and select “+ Create groups” from the “Groups” tab.

- Complete group details, such as the name, summary, tags and an optional thumbnail. Under “Group membership,” in the “Who can view this group?” section, ensure that “Everyone (public)” is selected and then save the group.

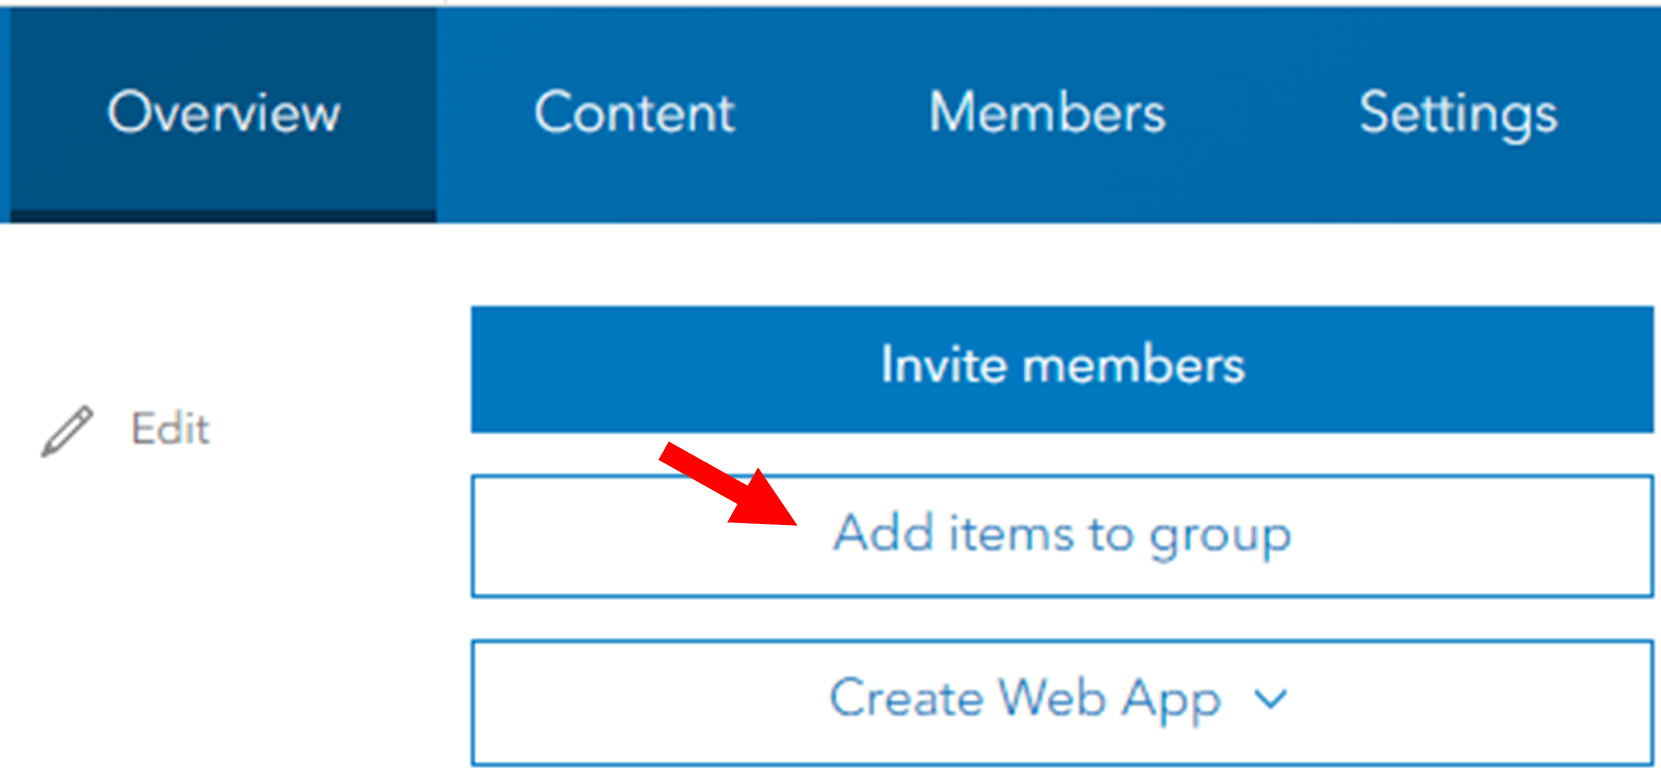
- Navigate to the Group’s Item Details page and click “Add items to group.”
- In the upper left dropdown menu, select the “Living Atlas.” In the Search Living Atlas Bar, enter “Community Map of Canada.” Apply the following filters:
- Item type: Maps
- Status: Authoritative

- The Community Map of Canada basemaps should now be visible. Select the web maps you would like to include from the Community Map of Canada and click “Add items” to add them to your group.
- Click the Organization tab to navigate back to your organization settings. In the Map and scene settings, click the Edit button in the “Basemap gallery for maps and scenes” section to open the Group drop-down menu. Select the new group you created with the Community Map of Canada basemaps.

- Optinally, you can click “Share basemaps” to share the existing Esri default basemaps with your new group.
- You should now see the Community Map of Canada basemaps as part of your basemap options in ArcGIS Online and ArcGIS Pro.
You can also manually add each of the basemap styles to your custom basemap group by navigating to the “Item Details” page for each item, clicking “Share,” “Edit group sharing,” and then selecting your group. A GeoSnap was created to accompany this blog which showcases this alternative approach and it can be viewed here or below.
You are now ready to use the Community Map of Canada basemap for all your mapping needs! For more information on the Community Map of Canada, please visit our website. If you would like more information about participating in the Community Maps Program, please fill out this form or contact us via email.
Resources: