Extending ArcGIS Urban with CityEngine: Generating Parcels & Subdivisions
ArcGIS CityEngine expands the parametric and generative planning functionality available with ArcGIS Urban, and can support your planning work at scale throughout the planning process. This blog is part 1 of a three-part series focusing on different integrations between Urban and CityEngine. In this part, we explore how we can leverage CityEngine to rapidly generate new street networks, blocks, and parcels at scale to support master planning and subdivision modeling work in ArcGIS Urban.
Introduction
ArcGIS Urban is a powerful tool for community planners, allowing for rapid modeling of urban growth and change to support growth management and planning policy development initiatives. However, ArcGIS Urban still requires a degree of manual work when preparing scenario content that can extend workflow timelines, especially when working across very large areas.
ArcGIS CityEngine offers powerful parametric generation of streets, lots, and buildings at scale, making it an invaluable tool in the ArcGIS Urban user’s toolbox.
Note: This series assumes a degree of familiarity with ArcGIS Urban. New to Urban itself? Check out this recent blog for an overview of the value Urban can bring, and explore the official Esri Training Plan for a hands-on tutorial on the basics of working with Urban.
How Can CityEngine Help?
ArcGIS Urban uses your existing parcel network as a starting point and allows you to model potential development on a lot-by-lot basis through creation of Plans. Within plans, potential new buildings can be automatically generated or manually drawn on each parcel. Plans also allow you to make quick edits to alternative versions of parcels within individual scenarios, such as merging and splitting neighbouring lots, cutting out roadways, and quickly sketching in new parcels. However, Urban’s parcel editing functionality is designed primarily for quick tweaks to existing parcels. When you need to generate a large number of new parcels at once - such as when exploring the development potential of a large site as a subdivision or modeling development on vacant or underutilized public land - these tools become inefficient.
ArcGIS CityEngine is here to help. With CityEngine, large scale networks of streets, blocks, and parcels can be generated with a few clicks, and these parcels can then be synced back to ArcGIS Urban for use in new scenarios.
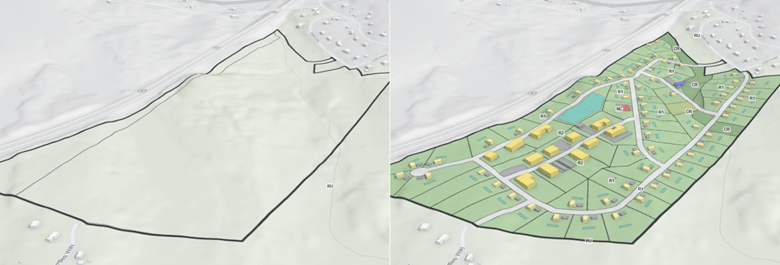
From empty, undeveloped land to an expansive new subdivision with ArcGIS Urban and CityEngine.
1. Connect to your ArcGIS Urban Plan
First we’ll need to open an existing ArcGIS Urban plan in CityEngine. Once complete, we are almost ready to begin creation of our new parcels. However, first we want to make sure that we have the correct scenario selected in CityEngine, so that the parcel edits we make are not written back to the wrong scenario in Urban. Within the “Scene” window, the coloured circular buttons correspond to the scenarios within your Urban plan. Select the scenario in which you want to model your new parcels.
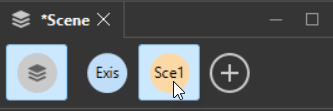
I will be working in the default “Scenario 1” for this new plan.
Unless you have already done some work within your Urban plan, by default your newly imported CityEngine scene will contain a small number of layers limited to current parcels, zoning information, and a terrain layer. If your study area contains significant variations in terrain elevation it is important to recognize that CityEngine stores parcels at a defined elevation, but Urban treats parcels as purely 2D geometry that is simply draped over terrain. Depending on your study area, CityEngine may initially display your existing parcels at different elevations, and they may be partially clipping through the 3D terrain layer.
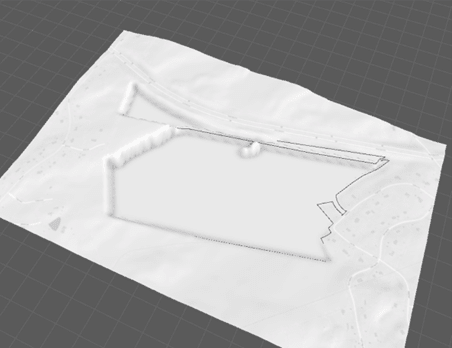
The initial view of our study area, currently made up of only two large, undeveloped parcels. Note the difference in elevation.
To make your next steps simpler, I recommend working purely in 2Dby taking the following steps:
- Turn off the Terrain and Zoning Layer visibility.
- Select all parcels within the Parcels layer, select the “Shapes” menu item along the top menu bar, and the “Align Shapes to Terrain” option.
- Configure the parameters of the pop-up that appears as below, and click “Continue”.
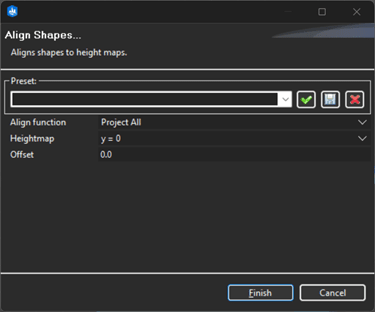
Set Align function to “Project All” Heightmap to y=0, and leave Offset at 0.0.
This will flatten all of your parcels to a 0 elevation plane so that you can more easily work with them. Don’t worry - this change will not impact how they display or function in Urban.
2. Prepare your streets
Now we are ready to get started with modeling our new subdivision. First, we will need to draw in our new street network. There are a few ways to get started with streets in CityEngine. If you are working on modeling new blocks within an area with an extensive existing street network, you can explore importing the existing street network directly into your scene from either a local file or from Open Street Map data - see here for more these workflows.
Whether you choose to import existing data or not, you will next need to draw in additional new streets to capture the layout of your new subdivision. For my study area, I have not imported streets, as much of the surrounding area is undeveloped. In this case, a first step is to draw in a “boundary” to my study area as part of my street network - this will allow CityEngine to generate parcels properly by ensuring my new subdivision has an outer bound. To do so, I’m going to open the Street Creation Tool and trace the edges of my old parcels, ensuring I close the loop. While drawing these boundaries, I will make sure both lane and sidewalk widths are set to 0 – I don’t want to be drawing in actual streets here, just a simple boundary.
Once I have traced the edge of my study area, it is time to start drawing the inner roads.

Using the street creation tool, I trace the boundary of my study area, then turn off the existing parcels and begin to sketch in my new road network.
3. Generate Your Parcels
Now the fun part - with our subdivision sketched out, we can use CityEngine to automatically generate new blocks and the parcels within them. Within my layer list I will turn on visibility for the “Block” sublayer. Parcels will be generated under default settings across the subdivision. We can then tweak the parcels further via the options within the Inspector window, such as changing the type of subdivision, parcel area & width minimum, and more. This is an excellent opportunity to ensure the parcels generated match any relevant regulations within the zoning bylaw, such as specific minimum lot sizes for lots in residential zones.

Default parcels are automatically generated. Selecting each block and using the options available in the Inspector window allows additional fine-tuning.
4. Publish Back to Urban
Once you’re happy with your parcels, it is time to publish them back to ArcGIS Urban. First, you must “bake” the dynamic parcels into static shapes. To do so, simply select all parcels, go to the “Graph” dropdown along the top menu bar, and click “Convert to Static Shapes”. Next, you will need to copy the new static shapes into the ArcGIS Urban parcel layer. First, delete any existing parcels within the Urban parcel layer that cover the area of your new subdivision. Don’t worry – this only deletes the existing parcels from your current scenario in Urban, and they will be maintained in other scenarios. Next, select all shapes within the new Static Shapes layer. Then go to the “ArcGIS Urban” tab along the top bar and select “Save changes to ArcGIS Urban”. Within the pop-up that appears check the box beside the scenario you have been working in and click “Overwrite”.
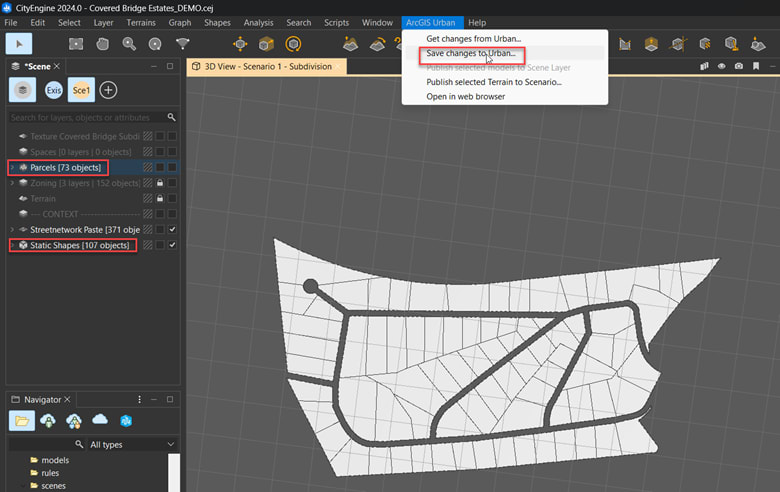
Copy the new parcels from the Static Shapes layer into the Urban Parcels layer, then save the changes back to Urban.
After a few moments, your parcels will be ready for use in ArcGIS Urban – refresh your browser window to see them.
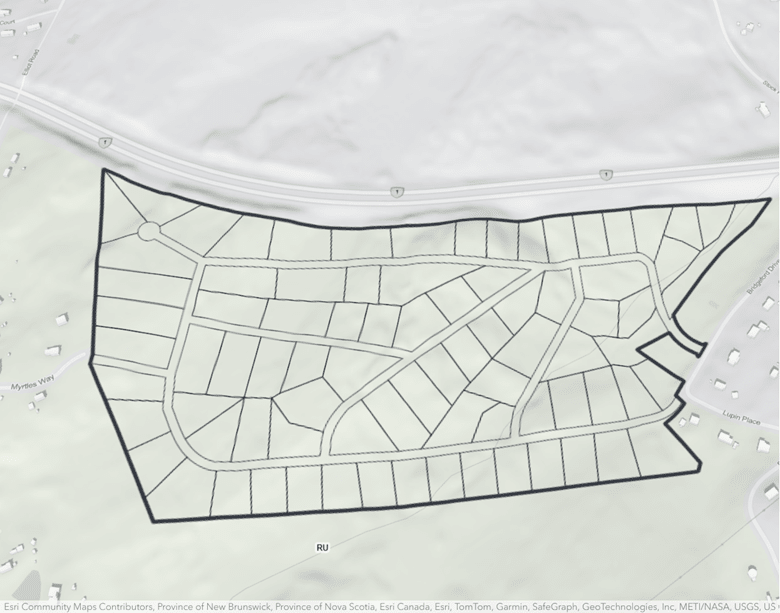
After saving changes to Urban, my new parcels are available within my Urban plan.
As a final step, consider performing parcel edge assignment in ArcGIS Urban to ensure setbacks are applied correctly to building models.
With this complete you have a new subdivision of parcels ready for use in modeling development.
I hope this article about rapid parcel generation for use in ArcGIS Urban helps improve the efficiency of your Urban workflows. This is the first of a three-part series. Keep an eye on this space for future parts, where we will explore how CityEngine can be used to extend ArcGIS Urban functionality in other ways, including generating complex multi-building lots and creating realistic architectural facades from Urban schematic massing.